Instant Database
At the 'back end' of the document assembly process (after the document is built and ready to personalize) Pathagoras continues to provide simple, plain text oriented solutions. The Instant Database module that comes with the program can quickly replace up to 999 separate variables found within the assembled document all in one sweep. Instant Database can scan for each [bracketed variable] (again, up to 999 separate variables) located within the document and present them in a list format where you can assign 'personal values' for the various variables. You can then either 'run' the search and replace routine or (probably better) first save the replacement list into a simple database. (If you save the data, you can then reuse it as often as you wish to complete other documents which contain the same variables).
Use 'Instant Database' to:
- substitute personal information for simple plain text variables placed throughout your document.
- save personal information for future (repeated) use in similarly 'coded' forms.
- save templates ('masks') to remind you of your coding scheme and substitution rules.
- quickly scan a document or form for [variables within brackets] and quickly and easily provide personal information to be substituted for the variable.
- Search and replace unlimited number of fields in a single pass.
Other Features:
- IDB can be effectively used as a basic, yet highly flexible, database system for users without a commercial database. If you don't have a database, InstantDatabase is an excellent substitute for, or first step into, databasing.
- IDB can take full advantage of documents already coded for, and linked to, your commercial database.
- IDB can be also used for those who want to create personalized documents without first having to input data into an existing database (e.g., to create a quick will, power of attorney, a bid, a one time letter, etc.).
- IDB can be used to augment the data in a commercial database. Many variables in a document may not be represented in the database. Use IDB to quickly and easily capture the rest of the variables.
- IDB can be indirectly linked to several popular database and PIM systems (e.g., TimeMatters) so that the personal data fields of the IDB mask can be populated with the personal data from a commercial database, even though the field names of the two systems do not match.
Instant Database allows you to list all of the items you want "searched and replaced" onto a simple form. Instead of doing an S&R routine for individual term (the typical Word method), Pathagoras allows you to do it all at once. An unlimited number of terms (actually 999) can be searched for and replaced in a single sweep.
Procedure:
Marking the text source
'Plain' Variables
Display the document you wish to code. Please note from the beginning that when Pathagoras says 'code' he means plain text. It can be a form letter, a complete document, or, more likely for the more advanced users of Pathagoras, the glossary from which you draw clause to build a complete document.
At the appropriate locations, assign variables. A variable is simply a word which acts as a holding place. It holds the place for the personalized text that ultimately will occupy that "spot" in the finished product.
For example, let's say you have created a Wills Glossary containing 100 clauses from which to choose. Let's also assume that you built that glossary from a "live document" and the names of the original Testator, the spouse, children, etc., still exist in the glossary. Here's how you would assign the variables:
1. Display the "Wills Glossary" on the editing screen.
2. Look for the names, addresses, numbers, etc., and substitute a letter or number variable as a place holder for that text. For example, use TTT (or TSTR, or Tstr, or anything you want to use) as a place holder for the name of the Testator (the person writing his or her will), SSS (or SPSE) as a place holder for the Testator's spouse, EEE for the Executor, and GGG for the Guardian of the children, etc. The only "rules" are that the variable should be a unique 'word' within the document, and not a real word itself (that's why I didn't use SPOUSE above) and not a part of another variable or real word.
Bracketed Variables
You can enclose the term within [brackets] (or other enclosing symbols). Then you don't have to worry about the unique name issue addressed above. You can use [SPOUSE] because the brackets themselves make the variable unique.
There is another advantage to [bracketed variables] -- Pathagoras can 'scan' for them in your document and automatically populate the IDB mask for you. See discussion about Scanning below.
Multiple choice variables:
If you want the user to be able to select among a series of choices, list those choices (up to 5) as the variables, separated by slashes. Pronouns are a popular entry, e.g., 'he/she/it/they' or 'him/her/them' but anything can be in the list, 'brilliant red/bright white/dark as night black/navy blue/hot pink'. Indeed, whole phrases, even sentences can be presented in the list, but there is a a practical limit, based on the IDB display parameters.
- You can enclose lists of terms within [brackets] (or other enclosing symbols) as well. As noted in paragraph 1 above, Pathagoras can 'scan' for these variables in your document and automatically populate the IDB mask for you. See Scanning below.)
Final Step
If you have not [bracketed] your variables, make yourself a list of the variables that you placed into your document. In the next steps. you will add these variables to the InstantDatabase mask so that you can quickly and easily create a highly personalized document from your now neutered text source. Save your document.
Scanning for Variables:
In addition to (or as an alternative to) the above techniques (in which the variables reside in the body of the letter, form, document, etc., without special markings) you may wish to take advantage of IDB's powerful Scan feature. This will allow you more flexibility in naming your variables, including more descriptive names and more natural language.
Place variable names in the document within {braces} or [brackets] or any other 'enclosing' character(s). When you call up a document that you want to personalize for a client or customer, select InstantDatabase and tell Pathagoras to <Scan> the document (the <Scan> button is in the button stack at the right of the IDB screen, toward the bottom. IDB will locate each [bracketed term] and place its name in the left hand column of the InstantDatabase form.
All that is left for you to do is to complete the right hand column. Just like with other IDB masks, you can even save all of your work for a later sessions. Using the Scan feature, it is acceptable to use 'real words for variables' (e.g., "[Name of Customer]"). Since the brackets set them apart, this will prevent the 'substitution confusion' that exists when you use something like "Name" or "Address" as a 'plain' variable.
See also the GotForms? pages for more information on how [bracketed variables] can bring an immense amount of power to your word processing system.
Even though you can <Scan> for variables, it is best to create a Mask for you most frequently used forms. Here is why:
|
Here is a typical blank InstantDatabase form:
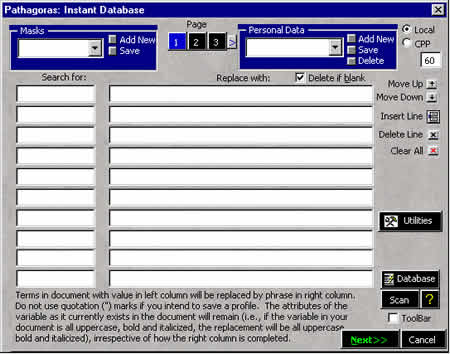
Notice the two columns of text boxes. Look at Instant Database as a very powerful Search & Replace tool. Indeed, that is all that it really is. The left column holds the variables (the 'search for' terms ) and the right column holds the personal data (the 'replace with' information). IDB displays 10 variables at a time, but can handle an unlimited number of fields. At the top of the page are boxes representing which page of variables are being displayed, and an arrow allowing you to view higher pages.
Simplest use of IDB:
If you have assembled (or are otherwise displaying) a document which contains variables that you want to "Search and Replace," activate Instant Database from the Pathagoras drop down menu. OR press <Alt-D>.
In the ‘Code’ (left hand) column, type the first variable contained in the document (e.g., ‘TTT’). In the ‘Value’ (right hand) column, type the text that should be substituted (e.g., ‘John Pathagoras’). On the second line, type the second variable and then the desired value. (You can press the <Tab> key to more from field to field). Continue until all variables are handled. When done, press the <Next> button. All ‘codes’ in the left hand column found in the document will be almost instantly replaced by the values you have assigned.
More 'advanced' use:
Create a “mask” which guides the user as to the coding of a particular document. By way of example, in the ‘Code’ column, type ‘TTT’ and in the ‘Value’ column type ‘Testator’s Name’; next line: SSS / ‘Spouse’s Name’ ; etc. The ‘values’ column should be filled out in such a way as to provide the user with visual hints as to what style of data should be inserted. (E.g., Date could mean lots of different styles. But if you put ‘Date: Month D, YYYY’ there will be no question as to what style is desired. Save this out as a mask by typing ‘Will’ in the text box on the "masks" side. Once saved, the user can then recall the mask from the list, fill in the values, press <Next>, and the document is quickly personalized.
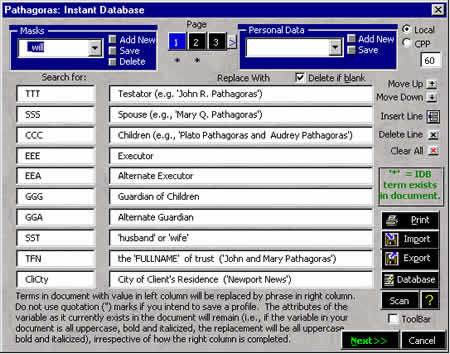
Notice the two columns of text boxes now contain data. The left column holds the variables (the 'search for' terms ) and the right column holds the instructions for how to complete the fields. The instructions are completely user provided and easily edited. Notice also the the asterisks below the boxes at the top numbered 1 and 2. Those asterisks indicate that variables appear on those pages. No variables appear on page 3. Box number 1 is displayed with a blue background. That indicates that it is the page currently being viewed.
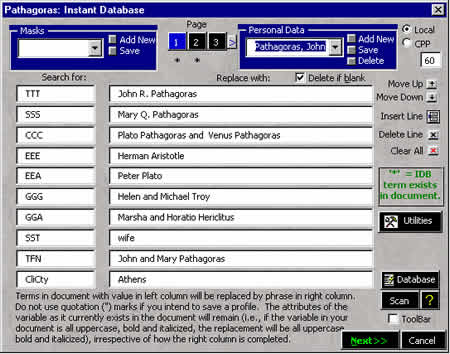
Most 'advanced' use:
Recall an already created mask (see above figure). Fill in the mask with real values in the ‘values’ column. Before pressing <Next>, save the personalized form under a name, such as: "Pathagoras, John". Voila, instant database. You can recall this from anywhere and use it in any properly pre-coded document or form.
Automatic call of IDB mask:
: You can cause InstantDatabase to automatically select and display a the appropriate mask for the particular document if you accomplish one of the following:
- If the directory or the glossary is a part of the DocAssem profile, set the 'Instant Database' field parallel to the topic in the DocAssembly setting screen to the name of the mask. or
- Recall the source document to the screen (either the glossary containing the terms, or the clause set. or, if a document is built from a collection of documents in a folder, recall just the document that will likely be the first one called. (If several documents could be the first one called, perform the next step on each of the possible 'first called' documents.) Go to the document's File|Properties screen and press the custom tab. In the ‘Name’ field, type the word "DataLinkAD"; in the ‘Value’ field type the name of the mask.
Frequent the mask will contain more variables than the document you ultimately create requires in order to adequately personalize it. For example, you may have created a Will that does not call for an alternate guardian for the children, yet the mask has a space to name one. In such case, it is a waste of time to complete that field. You could of course, create several masks and, when you create a Will (or other document) which doesn't call for certain information, the user can call up the more limited mask (Will1, Will2, Will3). But that defeats Pathagoras goal of simplicity. Besides the person who is actually putting together the clauses may still not know if the assembled document requires mask Will1, 2 or 3 to complete it. It is better that you create only one mask per subject (or group of like subjects) and that the mask contain all possible variables, but that Pathagoras do the hard work of telling the operator which variables (codes) need personal data. When call up InstantDatabase, the program quickly scans the document to see which mask variables actually are present in the document. An asterisk (star) will appear next to each field code which exists in the document. You have to try this one to appreciate (and maybe even understand) it.
Important Note regarding style:
When you search & replace text using Word's native S&R tool, the formatting of the replacement mimics that of the found text in its specific location. If the document contains the term ‘TTT’, then, using the above example, it will be replaced by “JOHN PATHAGORAS” (all caps). If, however, ‘Ttt’ is in the document, then the phrase ‘John Pathagoras’ (upper and lower case) would be put in its placed; Ttt would result in John Pathagoras (bolded and italicized); etc. Pathagoras adopts this replacement technique. The formatting of the terms within the document controls the replacement style. Formatting characteristics are important only in the coded document, not in the InstantDatabase.)
Other incidental uses. The above routine, as powerful and as fast as it is, is simply an augmentation of Words Search and Replace function. We use it in place of Search and Replace for ordinary S&R routines, and have adapted it for more sophisticated ones, such as converting documents from other sources (copied from DOS programs, copied off the Internet, etc.) The Clean Up button generates the following code in the Instant Database screen:
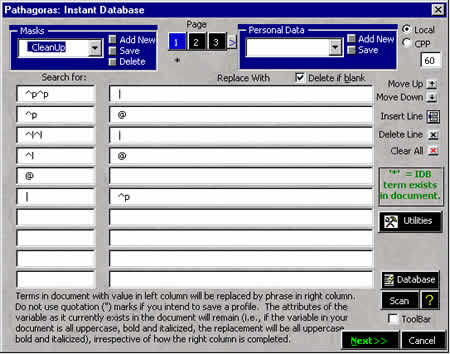
We call this "Instant Clean Up." Pathagoras is programmed to interpret the word 'space' in the above example as 'one press of the spacebar.'
There are many more uses (documented in the help screens, and undocumented anywhere, of Instant Database. Play with with. You will like it.
Here is how to create a mask:
Testing the mask:
|
Using the mask in a network setting:There are at least two ways that masks can be shared, depending upon how the InstantDatabase personal data is to be maintained.
|